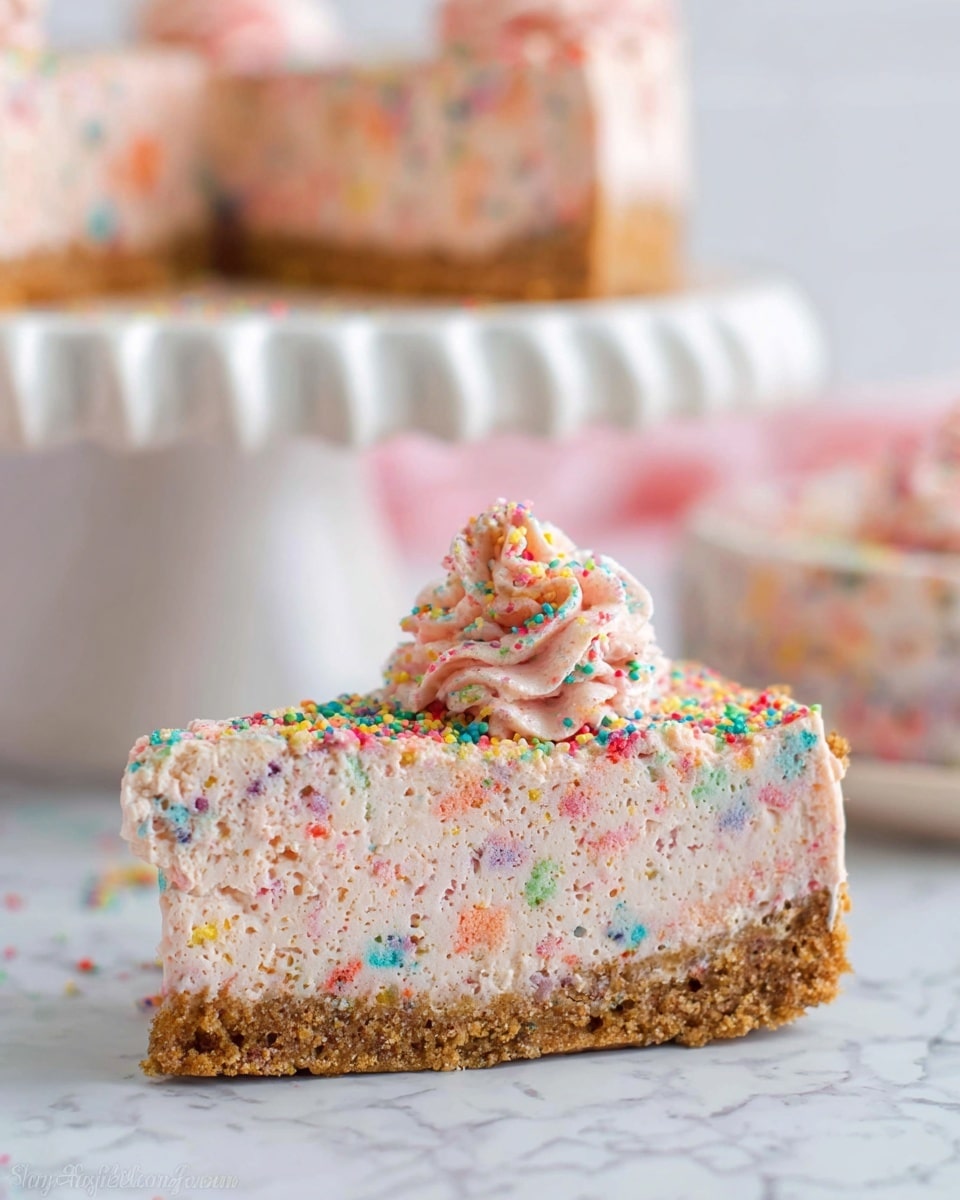
No-Bake Fruity Pebbles Cheesecake Recipe
Introduction
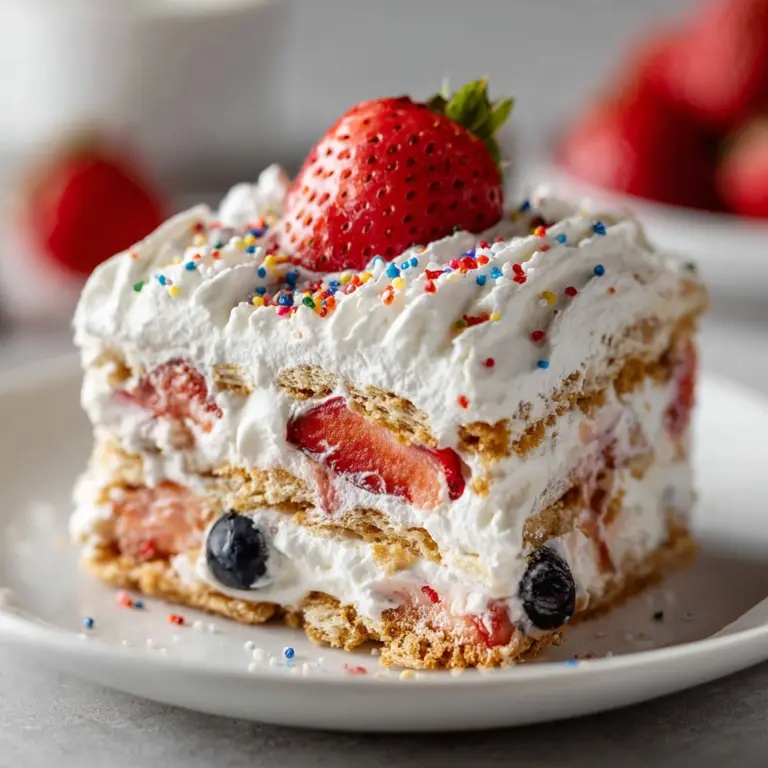
This No-Bake Fruity Pebbles Cheesecake is a colorful and fun dessert that combines the creamy richness of cheesecake with the nostalgic crunch of Fruity Pebbles cereal. It’s easy to make, requires no oven, and is perfect for a playful treat any time of year.
Ingredients
- 1 cup (104g) Nilla Wafer crumbs
- 2 cups (72g) Fruity Pebble Cereal, divided
- ½ cup (113g) unsalted butter, melted
- 1 ½ cups plus 2 tablespoons (384g) heavy whipping cream, divided
- ¾ cup (98g) powdered sugar, divided
- 16 ounces (452g) full-fat cream cheese, at room temperature
- ½ cup (95g) granulated sugar
- ½ cup (18g) Fruity Pebbles cereal (for garnish)
Instructions
- Step 1: For the crust, grind the Nilla Wafers and 2 cups of Fruity Pebbles cereal into fine crumbs using a food processor or blender. Combine the crumbs in a large bowl, then pour the melted butter over and stir to coat thoroughly.
- Step 2: Line the bottom of a 9-inch springform pan with parchment paper and lightly grease the sides. Press the crumb mixture evenly into the bottom and up the sides of the pan. Refrigerate while you prepare the filling.
- Step 3: For the filling, grind 2 cups of Fruity Pebbles cereal into a fine crumb. Chill a mixing bowl and whisk in the freezer for 10-15 minutes.
- Step 4: In the chilled bowl, beat 1½ cups of heavy cream on medium-high until soft peaks form. Add ¾ cup powdered sugar and continue beating to stiff peaks. Set aside.
- Step 5: In another bowl, beat the cream cheese on medium-high speed until smooth and free of lumps. Add granulated sugar and beat until combined. Add 2 tablespoons heavy cream and mix well, scraping the bowl as needed.
- Step 6: Gently fold the whipped cream into the cream cheese mixture until combined, then fold in the crushed Fruity Pebbles crumbs. Pour the filling over the chilled crust, cover, and refrigerate for at least 4 hours.
- Step 7: For the topping, grind additional Fruity Pebbles cereal into fine crumbs. Chill the mixing bowl again, then beat the remaining heavy cream with 2 tablespoons powdered sugar until stiff peaks form, adding the cereal crumbs during the last moments of beating.
- Step 8: Use a piping bag fitted with a large open star tip to decorate the cheesecake with the prepared whipped topping. Garnish with extra Fruity Pebbles cereal if desired. Serve chilled.
Tips & Variations
- For a gluten-free version, use gluten-free cookies instead of Nilla Wafers for the crust.
- Press the crust mixture firmly and evenly to ensure it holds together well.
- Chilling the mixing bowl and whisk helps achieve better whipped cream texture.
- Try adding a splash of vanilla extract to the filling for extra flavor.
Storage
Store the cheesecake covered in the refrigerator for up to 3 days. Keep it chilled until ready to serve. Leftovers can be kept refrigerated, but the topping may soften after a day. For best texture, consume within and avoid freezing as it may affect the creaminess.
How to Serve

Serve this delicious recipe with your favorite sides.
FAQs
Can I use a different cereal for this cheesecake?
Yes, you can substitute Fruity Pebbles with other fruity or colorful cereals, but the flavor and texture will vary slightly.
Do I need a springform pan for this recipe?
While a springform pan is ideal for easy removal of the cheesecake, you can also use a regular cake pan lined with parchment, but be careful when unmolding.
PrintNo-Bake Fruity Pebbles Cheesecake Recipe

This vibrant No-Bake Fruity Pebbles Cheesecake combines a buttery Nilla Wafer and Fruity Pebbles crust with a luscious cream cheese filling swirled with Fruity Pebbles cereal, topped with a colorful whipped cream and cereal topping. Perfectly chilled and bursting with fruity flavors, this sweet dessert is easy to prepare without any baking required.
- Prep Time: 30 minutes
- Cook Time: 0 minutes
- Total Time: 4 hours 30 minutes
- Yield: 10 servings 1x
- Category: Dessert
- Method: No-Cook
- Cuisine: American
Ingredients
Crust
- 1 cup (104g) Nilla Wafer crumbs
- 2 cups (72g) Fruity Pebble Cereal
- ½ cup (113g) unsalted butter, melted
Filling
- 1 ½ cups (360ml) heavy whipping cream
- ¾ cup (98g) powdered sugar
- 2 cups (72g) Fruity Pebbles cereal, crushed
- 16 ounces (452g) full-fat cream cheese, at room temperature
- ½ cup (95g) granulated sugar
- 2 tablespoons (30ml) heavy whipping cream
Topping
- ¾ cup (117ml) heavy whipping cream
- 2 tablespoons (16g) powdered sugar
- ½ cup (18g) Fruity Pebbles cereal, crushed
Instructions
- Prepare the Crust: Using a food processor or blender, finely grind the Nilla Wafers and Fruity Pebbles cereal separately, then combine in a large bowl. Pour melted butter over the crumbs and stir thoroughly to coat. Line a 9-inch springform pan with parchment paper and lightly grease the sides with cooking spray. Press the crumb mixture evenly into the bottom and up the sides of the pan. Refrigerate while preparing the filling.
- Make the Filling: Grind 2 cups of Fruity Pebbles cereal into fine crumbs with a food processor or blender. Chill a mixing bowl and whisk in the freezer for 10-15 minutes until cold. Beat 1 ½ cups heavy whipping cream on medium-high speed until soft peaks form, then add powdered sugar and continue beating to stiff peaks. Set aside.
- Prepare Cream Cheese Base: In a clean mixing bowl, beat the room temperature cream cheese on medium-high speed until smooth and lump-free, scraping down the bowl occasionally. Add granulated sugar and beat until fully incorporated. Pour in 2 tablespoons of heavy whipping cream and mix until combined, scraping the bowl as needed.
- Combine Whipped Cream and Cream Cheese: Gently fold the whipped cream into the cream cheese mixture by turning it over carefully from bottom to top until evenly combined. Then fold in the crushed Fruity Pebbles cereal into the batter. Pour the mixture into the prepared crust, cover, and refrigerate for at least 4 hours to set.
- Prepare the Topping: Grind ½ cup Fruity Pebbles cereal into fine crumbs. Chill a mixing bowl, then beat ¾ cup heavy cream at medium-high speed until soft peaks form. Add powdered sugar and crushed cereal and continue beating until stiff peaks form. Using a large open star round tip, decorate the top of the chilled cheesecake with the whipped cream mixture to create a colorful, textured finish.
Notes
- Ensure the cream cheese is at room temperature to avoid lumps for a smooth filling.
- Whipping bowls and beaters cold helps achieve better whipped cream volume.
- Press the crust firmly but gently into the pan to avoid cracking.
- Refrigerate the cheesecake for at least 4 hours or overnight for best firmness and flavor melding.
- Use a food processor or blender for finely crushing cereal and cookies to ensure even texture in crust and filling.
Keywords: No Bake Cheesecake, Fruity Pebbles Dessert, No Bake Dessert, Fruity Pebbles Cheesecake, Easy Summer Dessert, No Oven Cheesecake, Colorful Dessert