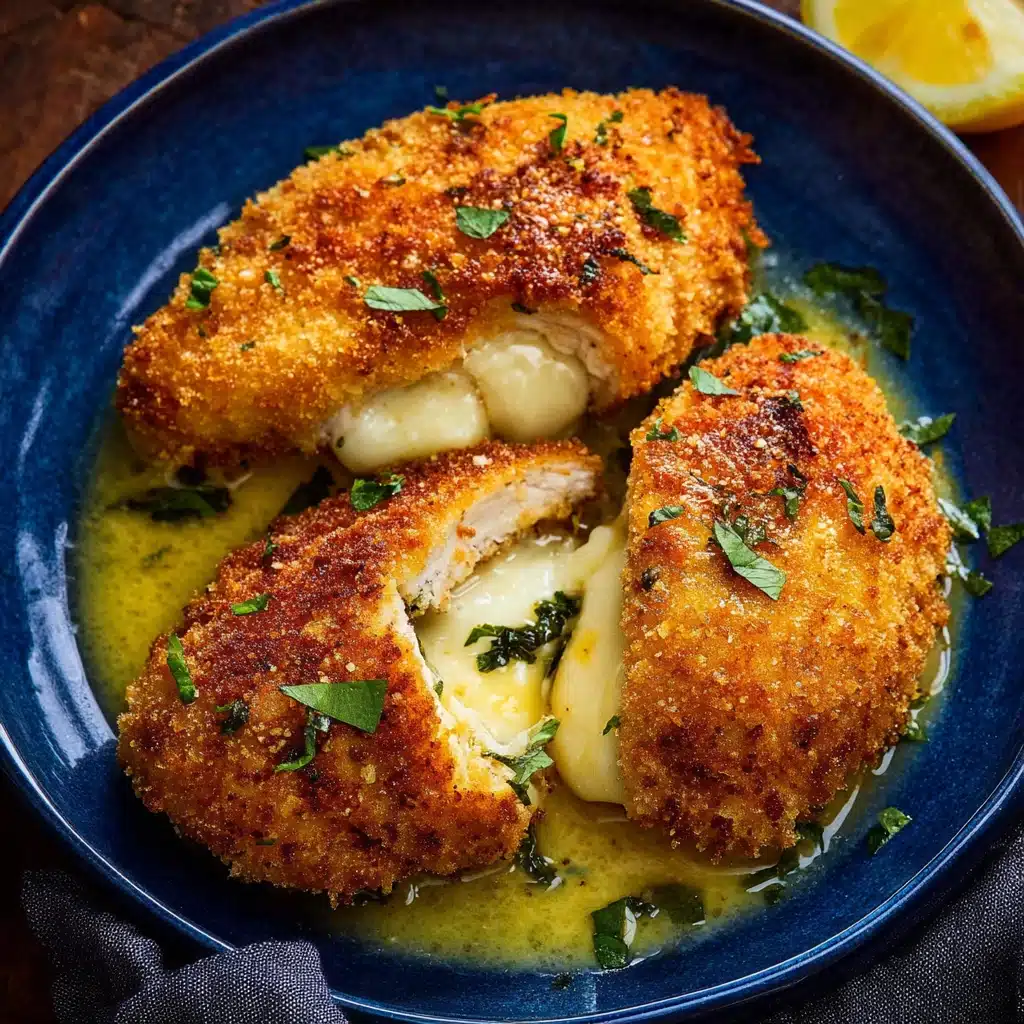
Chicken Kiev Recipe
Imagine slicing into a crispy, golden chicken breast to discover a fragrant rush of melted lemon-herb butter spilling onto your plate—this is the heart and soul of the Chicken Kiev Recipe. It’s one of those meals that feels lavish but approachable, equally at home on a weeknight table or as the centerpiece for a celebratory dinner. With its irresistible combination of juicy chicken, crunchy panko coating, and bright, garlicky butter, this classic dish instantly elevates any meal into something memorable. If you’ve never made Chicken Kiev before, prepare to fall in love with its flavor, texture, and sheer wow-factor.
Ingredients You’ll Need
The beauty of this Chicken Kiev Recipe is in its simplicity—each ingredient brings something special to the table. From aromatic garlic and fresh herbs to the perfect panko crunch, don’t skimp or cut corners; quality here makes all the difference!
- Unsalted butter: The basis of that magical, melted center; make sure it’s softened for easy blending with the aromatics.
- Garlic: Just one clove gives the lemon-herb butter a pungent, irresistible kick.
- Lemon juice: Freshly squeezed adds a bright, tangy note that keeps the butter light and lively.
- Fresh parsley: Its vibrant color and crisp flavor wake up the entire dish—reserve extra for garnish!
- Sea salt and freshly ground black pepper: Essential for seasoning both the butter and the chicken; don’t be shy!
- Chicken breasts: Choose large, evenly sized breasts for easier stuffing and even cooking.
- Eggs: Beaten eggs help the breadcrumb coating cling and create that signature crunch.
- All-purpose flour: Lightly dusting the chicken ensures the egg and breadcrumbs stick beautifully.
- Panko bread crumbs: Far crispier than regular breadcrumbs—the secret to that shatteringly golden crust.
- Extra light olive oil or canola oil: Use a neutral oil with a high smoke point for frying; it keeps the coating crisp, never greasy.
How to Make Chicken Kiev Recipe
Step 1: Prepare the Lemon-Herb Garlic Butter
Begin with the butter magic! In a medium bowl, combine your softened unsalted butter with minced garlic, lemon juice, fresh parsley, sea salt, and black pepper. Use a fork or spatula to mash and blend everything until it’s aromatic and completely homogenous. This flavorful compound butter is what sets the Chicken Kiev Recipe apart and guarantees every bite bursts with flavor.
Step 2: Prepare the Chicken
Take each chicken breast and carefully slice it in half lengthwise. Then, using a sharp knife, cut a deep pocket into the side of each piece—roughly two inches wide by three inches long. Take your time with this part: you want a sizable cavity for the butter, but you definitely don’t want to cut all the way through. That pocket is your butter’s safe haven!
Step 3: Stuff the Chicken
Spoon about one tablespoon of the lemon-herb butter into each chicken pocket, spreading it evenly inside. Once stuffed, pinch the opening tightly to keep all that flavor inside as it cooks, then season both sides of the chicken generously with salt and pepper for maximum flavor. This step is the secret to that luscious melted center every Chicken Kiev Recipe is famous for.
Step 4: Set Up Breading Stations
Assembly line time! Place flour on a plate, beaten eggs in a shallow bowl, and panko breadcrumbs in a third bowl. Setting up these stations is essential for a seamless breading process, making sure each stuffed breast gets evenly coated and super crisp.
Step 5: Bread the Chicken
Working one at a time, dredge each stuffed chicken breast first in flour, shaking off the extra. Dip into the eggs, letting any excess drip off, then coat it fully in panko breadcrumbs—it should look completely covered and ready for that golden crunch. Set each prepared chicken breast aside on a platter, ready for frying.
Step 6: Fry the Chicken Kiev
In a large, deep skillet, heat about a quarter-inch of oil over medium heat to around 350°F. Once shimmering, add the chicken breasts in a single layer. Fry for about four minutes per side, turning carefully, until the breadcrumbs are deep golden and the chicken is cooked through (a thermometer should read 165°F). Adjust the heat if needed to prevent the coating from burning. If you’re cooking in batches, give each piece plenty of space for the best texture.
Step 7: Serve
Transfer your finished Chicken Kiev to a plate and give it an extra sprinkle of salt, add fresh parsley, and serve immediately with lemon wedges. Slice carefully—hot, melted butter will rush out, so warn your lucky diners! This step brings everything together, highlighting the beauty and aroma of this Chicken Kiev Recipe.
How to Serve Chicken Kiev Recipe
Garnishes
A generous scattering of chopped fresh parsley and a big squeeze of lemon are all you really need—these accents brighten the dish and add a touch of color. Fresh parsley brings freshness to every bite, and lemon wakes up all those savory, buttery flavors.
Side Dishes
For classic comfort, pair your Chicken Kiev Recipe with creamy mashed potatoes or a mound of buttery rice pilaf to soak up every drop of that lemony butter. A crisp green salad or steamed green beans with just a drizzle of olive oil is perfect for balancing out the richness and keeping your meal fresh and vibrant.
Creative Ways to Present
If you’re feeling playful, try slicing each Chicken Kiev on a diagonal and fanning out the pieces for a restaurant-style look. Or serve smaller, finger-friendly portions as elegant appetizers—imagine mini Chicken Kiev “bites” with the same burst of herbed butter inside.
Make Ahead and Storage
Storing Leftovers
Wrap any leftover Chicken Kiev tightly in foil or transfer to an airtight container. Store in the refrigerator for up to three days—the coating will soften, but you’ll still get all those savory flavors when reheated.
Freezing
To freeze your Chicken Kiev Recipe, place uncooked, breaded chicken on a baking sheet and freeze until solid, then transfer to a zip-top bag or airtight container. When you’re ready to cook, fry straight from frozen—just add a few minutes to the cook time and ensure the center reaches 165°F.
Reheating
Reheat leftover Chicken Kiev in a 350°F oven for about 18 to 20 minutes until heated through and the crust has regained some crispness. Microwaving works in a pinch but will soften the breading, so the oven is always your best bet for reviving those delicious textures.
FAQs
Can I use chicken thighs instead of breasts?
While thighs are juicier, they can be tricky to stuff because they’re smaller and more irregular in shape. For the classic Chicken Kiev Recipe, chicken breasts work best, giving you enough space for that luscious butter filling.
How can I keep the butter from leaking out?
Seal the pocket as tightly as possible; pressing the chicken edges together before breading helps, as does chilling the stuffed breasts before frying. This gives the butter time to solidify and reduces the risk of leaks in the pan.
Can I bake instead of fry the Chicken Kiev?
Absolutely! While frying gives the most satisfying crunch, you can bake Chicken Kiev on a wire rack at 400°F for 25–30 minutes. Give the breaded chicken a light spray of oil for maximum crispiness.
What other herbs can I use in the butter?
Feel free to get creative with your butter—try adding fresh dill, tarragon, or chives for new flavors. Just keep the total amount of herbs to a couple tablespoons so the butter stays smooth and spreadable.
Can I prepare the Chicken Kiev Recipe in advance?
Definitely! Stuff and bread your chicken, then cover and refrigerate for up to 24 hours before frying. This not only makes entertaining easier but also helps the breading set and the butter firm up for that dramatic, melted center.
Final Thoughts
If you’ve ever wanted to wow your family and friends with a dish that tastes as spectacular as it looks, this Chicken Kiev Recipe is your ticket. Crispy on the outside, juicy on the inside, and bursting with lemony, herby butter, it deserves a place in your kitchen line-up. Give it a try soon—your future self will thank you!
PrintChicken Kiev Recipe

Indulge in the classic Chicken Kiev recipe with a crispy exterior and a burst of flavorful Lemon-Herb Garlic Butter inside. This dish is sure to impress your dinner guests with its juicy chicken and aromatic buttery goodness.
- Prep Time: 25 minutes
- Cook Time: 10 minutes
- Total Time: 35 minutes
- Yield: 3 servings 1x
- Category: Main Course
- Method: Frying
- Cuisine: Russian
- Diet: Non-Vegetarian
Ingredients
Lemon-Herb Garlic Butter:
- 6 Tbsp unsalted butter, softened
- 1 large garlic clove, minced
- 1 Tbsp lemon juice, plus extra lemon wedges for serving
- 2 Tbsp fresh parsley, chopped, plus more for garnish
- 1/2 tsp sea salt
- 1/2 tsp freshly ground black pepper
Chicken Kiev:
- 3 large chicken breasts (about 12 oz each)
- 2 eggs, beaten
- 1/2 cup all-purpose flour
- 2 cups Panko bread crumbs
- 1/2 tsp salt, plus more for seasoning
- 1/2 tsp black pepper, freshly ground
- Extra light olive oil or canola oil for frying
Instructions
- Prepare the Lemon-Herb Garlic Butter: In a medium bowl, mash the softened butter with minced garlic, lemon juice, chopped parsley, salt, and pepper until well combined. Set aside.
- Prepare the Chicken: Slice each chicken breast in half lengthwise to create two even pieces. Carefully cut a deep pocket into the side of each piece, about 2 inches wide by 3 inches long, without cutting all the way through.
- Stuff the Chicken: Fill each pocket with about 1 tablespoon of the lemon-herb butter. Close the pocket and press the chicken to spread the butter inside. Pinch the opening tightly to seal. Season both sides of the chicken breasts with salt and pepper.
- Set Up Breading Stations: Place the flour on a plate. Beat the eggs in a shallow bowl. Place the panko bread crumbs in a third bowl.
- Bread the Chicken: Dredge each stuffed chicken breast in flour, shaking off excess. Dip into the beaten eggs, allowing excess to drip off, then coat thoroughly in panko breadcrumbs. Set aside on a platter.
- Fry the Chicken Kiev: Heat about 1/4 inch of oil in a large, deep skillet over medium heat (about 350°F). Once hot, add the chicken breasts in a single layer, frying for about 4 minutes per side, or until golden brown and cooked through (internal temperature should reach 165°F). Adjust heat as necessary to prevent burning. Fry the second batch if needed.
- Serve: Transfer cooked chicken to a plate and season with a sprinkle of salt. Garnish with fresh parsley and serve with lemon wedges to squeeze over the top. Be cautious of hot melted butter when cutting into the chicken.
Nutrition
- Serving Size: 1 chicken breast
- Calories: 450
- Sugar: 2g
- Sodium: 700mg
- Fat: 25g
- Saturated Fat: 11g
- Unsaturated Fat: 12g
- Trans Fat: 0g
- Carbohydrates: 21g
- Fiber: 1g
- Protein: 34g
- Cholesterol: 160mg
Keywords: Chicken Kiev, Chicken Recipe, Lemon-Herb Butter, Dinner Recipe


